Styling a line layer
The roads layer contains line geometries, so we will use a line symbolizer.
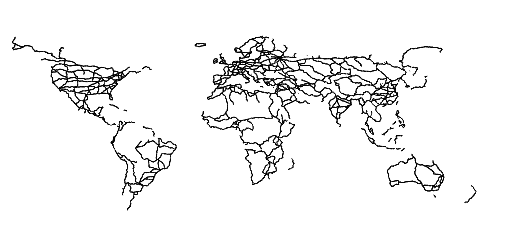
Viewing the existing style
In the layers tab of Composer, click the style option for the
roadslayer to go to the style edit page. A simple default style is already associated with this layer.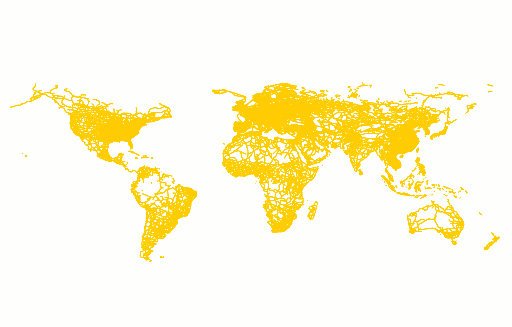
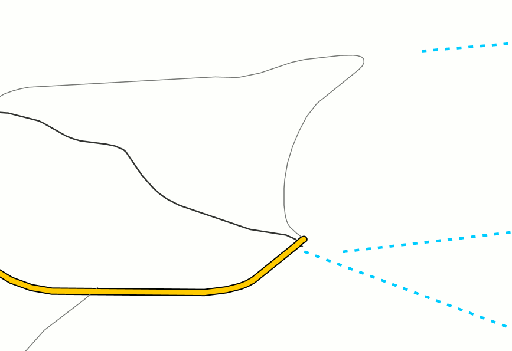
Default line style
Note
Your default color may vary.
The default style will look something like this:
name: Default Styler
title: A gray line style
feature-styles:
- name: name
  rules:
  - title: Dark gray line
    symbolizers:
    - line:
        stroke-color: '#333333'
        stroke-width: 1
Basic edits
As with the polygon layer, change the names and title to something more appropriate:
name: roads
title: Roads style
feature-styles:
- name: roads
  rules:
  - title: Dark gray line
    symbolizers:
    - line:
        stroke-color: '#333333'
        stroke-width: 1
We can immediately see that there are far more roads than we need on this layer. Fortunately, the road data contains a
scalerankattribute to help determine the importance of different roads. Add a filter to only show roads withscalerank < 4. Plus a name for the rule. Then our style looks like:name: roads title: Roads style feature-styles: - name: roads rules: - name: big filter: ${scalerank < 4} symbolizers: - line: stroke-color: '#333333' stroke-width: 1
The layer now appears much less cluttered:
Only important roads are shown (
scalerank < 4)
Setting scale
If we zoom in, we want to see all the roads, not just those included in our filter. The scale property can be used with rules to show or hide features depending on the zoom level. In order to determine what roads to show, we will again use the scalerank attribute of the data to add the following rules:
- If scale is less than 8000000, show features with
scalerank < 4 - If scale is between 2000000 and 8000000, show features with
scalerank < 8 - If scale is greater than 2000000, show all features
Add a scale to the existing (
big) rule, and add the other two rules (mediumandsmall):Note
YAML requires that the rules form a list with the same amount of indentation as shown below. To adjust indentation select a block of text and use Tab (or Shift-Tab) as appropriate.
name: roads
title: Roads style
feature-styles:
- name: roads
  rules:
  - name: big
    scale: [8000000,max]
    filter: ${scalerank < 4}
    symbolizers:
    - line:
        stroke-color: '#333333'
        stroke-width: 1
  - name: medium
    scale: [2000000,8000000]
    filter: ${scalerank < 8}
    symbolizers:
    - line:
        stroke-color: '#333333'
        stroke-width: 1
  - name: small
    scale: [min,2000000]
    symbolizers:
    - line:
        stroke-color: '#777777'
        stroke-width: 0.5
Note
You can replace the scale values with scientific notation if you’d like:
8e6for8000000,2e6for2000000.
Differentiating features
On the smaller scales, we want some differentiation between roads based on the feature’s type. We will use the featurecla attribute for this:
Add a new rule for roads that have attribute
featurecla = 'Ferry', and draw these roads with a blue line. Put this rule third in the list of four:rules: - name: big scale: [8000000,max] filter: ${scalerank < 4} symbolizers: - line: stroke-color: '#333333' stroke-width: 1 - name: medium scale: [2000000,8000000] filter: ${scalerank < 8} symbolizers: - line: stroke-color: '#333333' stroke-width: 1 - name: ferry scale: [min,8000000] filter: ${featurecla = 'Ferry'} symbolizers: - line: stroke-color: '#00CCFF' - name: small scale: [min,2000000] symbolizers: - line: stroke-color: '#777777' stroke-width: 0.5
Further modify this rule to use a dashed line. Add the following
stroke-widthandstroke-dasharraylines at the bottom, at the same indentation as thestroke-color:- name: ferry scale: [min,8000000] filter: ${featurecla = 'Ferry'} symbolizers: - line: stroke-color: '#00CCFF' stroke-width: 2 stroke-dasharray: '4 6'
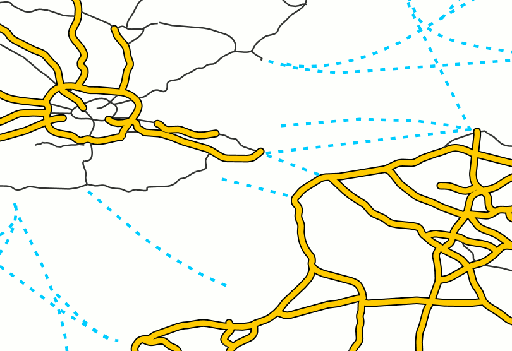
After adding the ferry rule, this is the view when zoomed in:
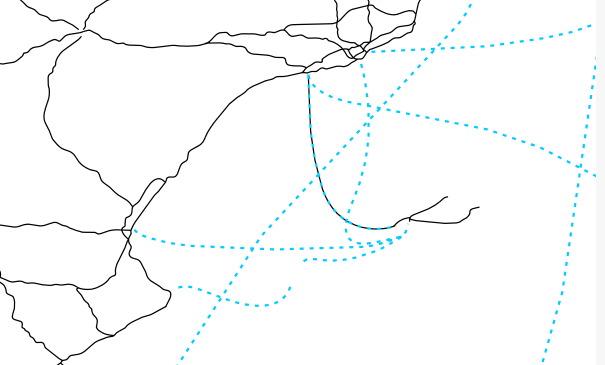
Ferry rule and other styles
Adding road casing
Line symbolizers only have a stroke, so you cannot normally draw an outline around a line. This effect can be simulated by drawing two line symbolizers of different widths, one on top of the other.
Add a new rule to draw expressways (
${expressway = 1}) using 6 pixel black lines with round ends. This will be our outline:- name: ferry scale: [min,8000000] filter: ${featurecla = 'Ferry'} symbolizers: - line: stroke-color: '#00CCFF' stroke-width: 2 stroke-dasharray: '4 6' - name: expressway scale: [min,8000000] filter: ${expressway = 1} symbolizers: - line: stroke-color: '#000000' stroke-width: 6 stroke-linecap: round - name: small scale: [min,2000000] symbolizers: - line: stroke-color: '#777777' stroke-width: 0.5
In order to ensure the inner line is drawn last, it must be in a separate feature style. At the bottom of our style, below the
smallrule add a new feature style (not a rule, as before) which contains a rule to draw expressways using 4 pixel orange lines with round ends:- name: small scale: [min,2000000] symbolizers: - line: stroke-color: '#777777' stroke-width: 0.5 - name: inner rules: - name: expressway scale: [min,8000000] filter: ${expressway = 1} symbolizers: - line: stroke-color: '#FFCC00' stroke-width: 4 stroke-linecap: round
The first feature type style will draw expressways as a black casing, the second will draw expressways as an orange line. When these two drawings are composed together they will form an orange line with black casing.
After adding the ferries and expressways rules, this is the view when zoomed in:
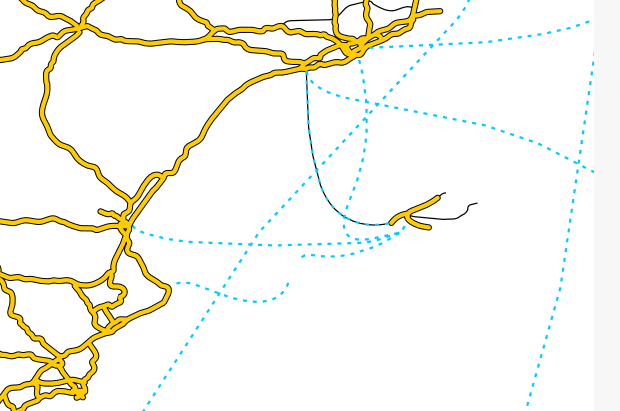
Road casing and other styles
Now that we have these rules for special types of “roads”, we want to make sure our
mediumrule does not also draw lines for these special roads. We can add a filter to the rule to exclude these from the rule (<>means “not equal to”):- name: medium scale: [2000000,8000000] filter: ${scalerank < 8 AND expressway <> 1 AND featurecla <> 'Ferry'} symbolizers: - line: stroke-color: '#333333' stroke-width: 1
Using else to account for all other features
When we added the above rules, we made them apply for all zoom levels below 8000000. However, we still have a rule that draws all the roads if the zoom level is below 2000000. We want to use this rule, but we do not want it to apply if we are already drawing a styled road.
To accomplish this, we can make an else rule. This means that it will only apply if no other filter is true. This way, when we zoom in, we eventually see all the roads, without drawing over our special styles for ferries and expressways.
Change the scale of the
mediumrule:- name: medium scale: [min,8000000] filter: ${scalerank < 8 AND expressway <> 1 AND featurecla <> 'Ferry'} symbolizers: - line: stroke-color: '#333333' stroke-width: 1
Modify the
smallrule with anelse:- name: small scale: [min,2000000] else: true symbolizers: - line: stroke-color: '#777777' stroke-width: 0.5
Using firstMatch to simplify rule conditions
The medium rule has a compound filter condition.
filter: ${scalerank < 8 AND expressway <> 1 AND featurecla <> 'Ferry'}
However, if we reorder the rules and employ the x-firstMatch parameter, we can simplify this condition and also improve the efficiency of the rendering. Specifically, if we make sure that the medium rule is right after the ferry and expressway rules, then we will no longer need to check for the inverse of those conditions, because they will be the only features remaining.
Move the
mediumrule to after theferryandexpresswayrules.- name: ferry scale: [min,8000000] filter: ${featurecla = 'Ferry'} symbolizers: - line: stroke-color: '#00CCFF' stroke-width: 2 stroke-dasharray: '4 6' - name: expressway scale: [min,8000000] filter: ${expressway = 1} symbolizers: - line: stroke-color: '#0 00000' stroke-width: 6 stroke-linecap: round - name: medium scale: [min,8000000] filter: ${scalerank < 8 AND expressway <> 1 AND featurecla <> 'Ferry'} symbolizers: - line: stroke-color: '#333333' stroke-width: 1
Add the
x-firstMatch: trueparameter to the top of the feature style that includes these rules (soalmost at the very top of the style):name: roads title: Roads style feature-styles: - name: roads x-firstMatch: true rules: - name: big
Now remove the unnecessary conditions on the medium rule:
- name: medium scale: [min,8000000] filter: ${scalerank < 8} symbolizers: - line: stroke-color: '#333333' stroke-width: 1
There should be no difference in the display with this change.
Final style
After all these changes, the final style should look like this:
name: roads
title: Roads style
feature-styles:
- name: roads
x-firstMatch: true
rules:
- name: big
scale: [8000000,max]
filter: ${scalerank < 4}
symbolizers:
- line:
stroke-color: '#333333'
stroke-width: 1
  - name: ferry
    scale: [min,8000000]
    filter: ${featurecla = 'Ferry'}
    symbolizers:
    - line:
        stroke-color: '#00CCFF'
        stroke-width: 2
        stroke-dasharray: '4 6'
- name: expressway
scale: [min,8000000]
filter: ${expressway = 1}
symbolizers:
- line:
stroke-color: '#000000'
stroke-width: 6
stroke-linecap: round
- name: medium
scale: [min,8000000]
filter: ${scalerank < 8}
symbolizers:
- line:
stroke-color: '#333333'
stroke-width: 1
  - name: small
    scale: [min,2000000]
    else: true
    symbolizers:
    - line:
        stroke-color: '#777777'
        stroke-width: 0.5
- name: inner
rules:
- name: expressway
scale: [min,8000000]
filter: ${expressway = 1}
symbolizers:
- line:
stroke-color: '#FFCC00'
stroke-width: 4
stroke-linecap: round
The resulting map shows different levels of road detail at different zoom levels:

Completed Roads layer (zoomed out)
Completed Roads layer (intermediate zoom)
Completed Roads layer (zoomed in)
Continue on to Styling a point layer.